Easy Spring Charcuterie Bouquet Board Recipe

Looking for the perfect appetizer for your next party? Make a Charcuterie Bouquet Board. With fresh fruits and vegetables plus meat and cheese “flowers”, this fun spring charcuterie board idea is one your guests will love!

This Spring Charcuterie Bouquet Board recipe with fresh fruits and veggies, breadsticks, and meat and cheese flowers is one of my favorite charcuterie board ideas for spring parties and Easter brunch. It’s budget-friendly and so cute. Make one next time you need snacks for a crowd.

Charcuterie Board that looks like a bouquet on a white table.
Let’s make this easy Charcuterie Bouquet!

The cutest Spring Charcuterie Board

I saw a bouquet charcuterie board in an AD on Pinterest and knew I needed to make my own! I love to entertain, and I am always looking for easy recipes for family gatherings.

Amigas! This recipe does not require any stovetop cooking, SCORE! This is more of a savory charcuterie board and because it uses a lot of fresh, seasonal produce, it’s budget-friendly! A few cheese, pepperoni and salami flowers add color and flavor without breaking the bank!

I love to add lots of colors and textures to my recipes. I feel that when food looks good, the eating experience is more pleasurable.

Pair this bouquet board with a luscious Cabernet or your favorite red wine. Be sure to sip some while you make this. It will help get your creative juices flowing…

Ingredients

Close up of fruits, vegetables, and cheese and salami roses to make a spring charcuterie board that looks like a bouquet.

I picked up most of the items at Trader Joe’s because they have great prices on items to put on a charcuterie board. You can find most of these things also at your local store.

  • Kale on the stalks to create the foundation
  • A variety of meats to make meat roses or flowers
  • Thin sliced cheese to roll into flowers
  • A variety of vegetables like mini heirloom tomatoes and asparagus
  • Olives (without the pit)
  • Green grapes
  • Fresh basil
  • Breadsticks

I chose this Salami, Prosciutto, and Capocollo variety pack because it was more cost-effective, and I thought the colors would look great in my arrangement.

The mini Heirloom tomatoes are a great way to add pops of color to the board but you can also use cherry tomatoes if you can’t find the heirloom variety.

I like the Greek Kalamata Olives from Trader Joe’s because they don’t have a pit.

These are the items that I picked up but I invite you get creative and make this your own!

How to Make a Charcuterie Bouquet Board

Before you begin arranging the bouquet board, you’ll want to prepare the asparagus.

Microwave the asparagus to keep things easy. Season lightly with a little salt and pepper and let it cool before putting the bouquet board together.

Step 1

Kale stalks laid out on a white table for the background of a charcuterie bouquet board.

Lay out the kale in a shape resembling a bouquet you might buy from the store. This is essentially the “greenery” that usually acts as a base for the floral arrangement.

Step 2

Place a bunch of breadsticks together to make the “stem” of the bouquet. Place a few extra breadsticks around the edge of the bouquet.

Step 3

Wrap the salami and cheese around the head of the cooked asparagus to create flowers. Any leftover asparagus can be placed throughout.

You can also make salami roses if you want to take a little bit more time. Just tuck them between other items already on the board to help keep them rolled.

Step 4

Place some of the grapes, tomatoes and olives on the kale.

Step 5

Place basil leaves throughout to look like leaves.

Step 6

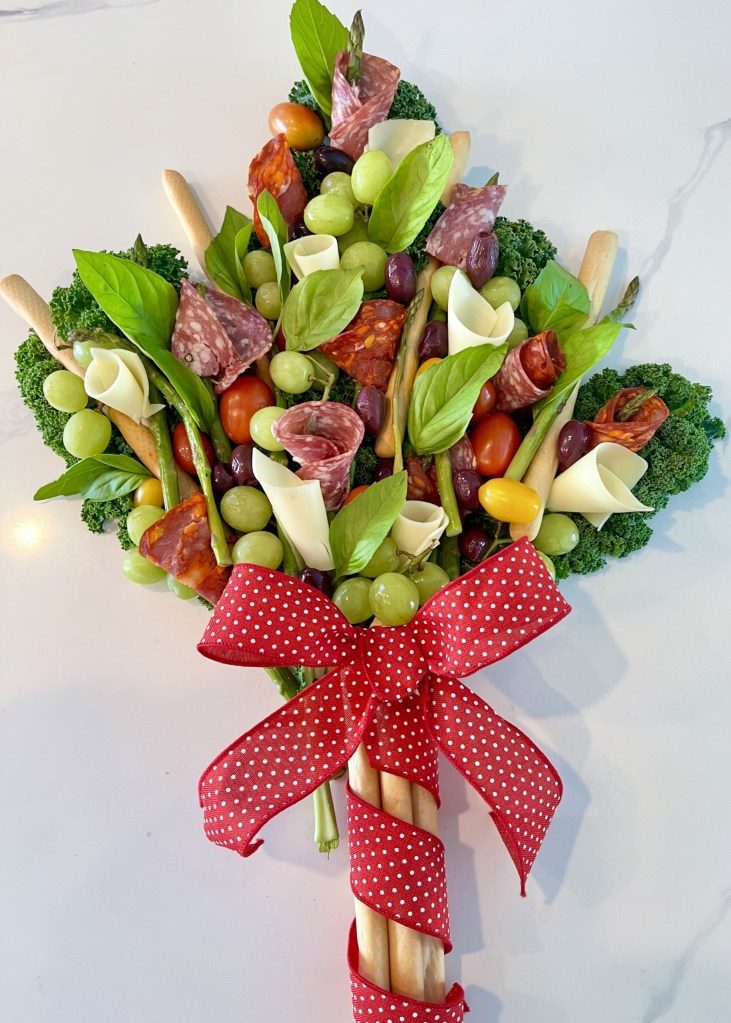
Wrap a pretty ribbon around the breadsticks to give it the perfect finishing touch.

Ribbon wrapped breadsticks that are the base of a spring bouquet board with charcuterie.

Voilà! I truly loved how this Spring Charcuterie Bouquet Board turned out! You should definitely try to make it as well. You will definitely impress your family and friends and this would also make a great hostess gift for Easter and beyond!

See another look of the finished bouquet in this video I made for Instagram.

More easy recipes that are perfect for parties

Charcuterie Bouquet Board

With fresh fruits and vegetables plus fun meat and cheese "flowers", this is the perfect spring charcuterie board! It's a fun snack platter idea for parties and Easter brunch.

Course Appetizer
Keyword appetizer, charcuterie, cheese, entertaining, recipe
Prep Time 30 minutes
Total Time 30 minutes
Servings 8 people
Author Angela Camacho

Ingredients

  • 1 bunch Kale leaves with stems
  • 1 box Italian bread sticks will be used for bouquet stem
  • 1 bunch Asparagus microwave
  • 10-15 whole Kalamata Olives
  • 10 whole Mini Heirloom tomatoes choose colorful
  • 1-2 packs Swiss, Sharp, American Cheese or your cheese of choice
  • 1 mixed pack Salame, Calabrese, and Prosciutto or meat of choice
  • 10 leaves Basil

Instructions

  1. 1. First choose a surface or charcuterie tray of choice.

    2. I began arranging the kale, then slowly I started adding the other food items.

    3. I arranged 4 breadsticks.( I let them pop out a bit)

    4. I microwaved the asparagus for 2.5 minutes.

    5. I wrapped the salami and cheeses around the head of the cooked asparagus to create flowers.

    6. I then added the colored mini heirloom tomatoes, olives, and grapes.

    7. Lastly, I added basil leaves where I felt it would look good.

    8. I added a ribbon and tied them around the breadsticks that I used for stems.

    kale

Recipe Notes

Use this recipe as a guide, but feel free to change up the items that you used based on the flavors you like and what you can find fresh in season. 

Giveaway: The Kids’ Book of Paper Love & Michaels Gift Card #FlowBook

Do your kids like paper DIY projects? If so, I have the perfect book for your kiddos!

My son and I are creating a mini scrap book for our family travel adventures, and we will be using The Kid’s Book of Paper Love to create it. My youngest is grow so fast, and I feel this book is perfect to help us create and bond together. I enjoy his company because he always tells me about his day at school, and the friendships he is creating. This fun little book has glitter stickers, colorful paper, metallic paper, and cut outs, and hundreds of other paper goodies!

There are many wonderful reasons to create with your children. Above it all, it opens the lines of communication. (so important) For example, art activities create a sense of achievement inside kids, In addition, it helps them a boost to their self esteem. Helping your child to create something tells them that they are in control and this helps build immense confidence in them!

Celebrate your budding artist! Enter the Rafflecopter below for a chance to win The Kids’ Book of Paper Love and a $50 gift card to Michaels!

Disclosure: Thank you Workman Publishing for sponsoring this post. All opinions are my own.

A surprise on every page!

Brimming from cover to cover with projects and other paper surprises, The Kids’ Book of Paper Love, from the bestselling editors of Flow magazine and books, is a bounty of a book that begs to be folded, cut up, collaged, doodled on, and shared.

“Dare to Dream” How cute is this banner? There is just so much fun on every page!

Loop paper strips into a paper chain. Snip out bookmarks. Fold a paper house. Make photo booth props—a silly mustache, a crown—to pose with friends. Bind up a DIY storybook and use it to sketch out adventures and dreams. Construct a paper flower bouquet, a paper terrarium, a fortune-teller with prompts like Lend someone a book and tell them why you recommend it.

The Kids’ Book of Paper Love

From the editors of Flow magazine

Irene Smit & Astrid Van Der Hulst

Release October 15th, 2019

Recommend ages 7-14

My girls just loved these photo booth props!

Pick up your copy of The Kids’ Book of Paper Love today!

Follow Workman Publishing on InstagramTwitter and Facebook!

Follow Flow Magazine on InstagramTwitter and Facebook

Enter the Rafflecopter below by November 8, 2019, for a chance to win The Kids’ Book of Paper Love & $50 Michaels Gift Card

a Rafflecopter giveaway

DIY: Make your own Percy Jackson & The Olympians Board Game

Disclosure: Thank you Disney Book Group for sponsoring this post.

My son is taking the Percy Jackson summer reading challenge and he just finished reading the first book, “The Lightning Thief.” He is hooked on this adventurous series, and can’t wait to go on to the next book!

I’m challenging my son to finish the Percy Jackson series before summer’s end, and I encourage you to do the same with your kids!

Percy-Jackson-DIY

Andrew has only been on summer break for a week, and I am trying my best to keep him occupied. We decided it would be fun to make our very own Percy Jackson and the Olympians board game together. I also thought that it would be a great idea to incorporate trivia questions to help him with comprehension.

Summer reading is critical for students to retain the skills learned in the previous school year. Children who don’t read are at risk of falling behind their classmates. Parents can avoid this by making sure kids take time to read. One great way to get your kids excited about reading is to create a game based on the books they’re planning to tackle this summer!

I have attached some printables and trivia questions to this post to help you and your child create a Percy Jackson & the Olympians game like ours!

Percy-Jackson-DIY

Here is a list of things you will need to get started:

  • Blank board game or large poster board
  • Colored construction paper & glitter
  • Markers, colored pencils, or crayons
  • Stickers or computer image printouts
  • Glue stick
  • Dice and/or spinner

Instructions for making your game board:

Create a Percy Jackson & the Olympians “world.” Use your images, stickers, paint and glitter to make the board colorful and unique. Cut 1.5 x 1.5 inch squares, and create a path with a game beginning and end. There is no right or wrong when creating your own game board. The point is to be creative and have fun!

We found this blank board game containing game pieces, blank cards, blank spinner & dice online!

Percy-Jackson-DIY

We took out paint and glitter, and printed images relating to the Percy Jackson series like lightning bolts and ocean waves. Feel free to use any of the printables I have attached here when making your own game.

Percy-Jackson PrintablesDownload

Percy-Jackson-DIY

Throughout our path of squares that lead from start to finish, we added directions like “Back 2 Spaces”, “Draw an adventure card,” or “Take a spin!” 

Instructions for making your spinner:

If you land on “Take a spin!”, you spin the wheel to determine what to do. Divide your spinner into 4 – 6 sections, which you can differentiate by color. 

Then we wrote in various game options like:

  • Go forward 1 space
  • Go back 2 spaces
  • Go to the “Underworld” and lose a turn
  • Take an adventure card!

Andrew also added a rock, paper, scissors option to our spinner!

Percy-Jackson-DIY

If you don’t have a spinner, you can still play! Just fill in each of the white squares with directions similar to what would go on the spinner so that on every turn you land on something.

Instructions for making your “Adventure Cards”:

I used Quizlet Online to create my own flashcards of Percy Jackson & the Olympians trivia!  Here are some trivia questions to get you started. Print them here. Click here for quiz cards on the characters from Percy Jackson & the Olympians.

When it’s your turn, and the square or spinner tells you to take an adventure card, you must answer a trivia question in order to move forward in the game. (If you get it right on the first try, move forward 3 squares! If you get it right on the second try, move forward 1 square. If you miss the question after 3 tries, go back two squares.)

Percy-Jackson-DIY

Print Instructions: Use the print option shown above.

Percy-Jackson-DIY

GAME RULES: Here are the instructions to the game we created. Feel free to use them or modify as you like!

  • Up to 4 players (participants must be familiar with the book series to play)
  • 1st player throws the dice. If the dice lands on an odd number, move forward 1 space. If it lands on an even number, move forward 2 spaces. Player must follow the instruction of the square they land on (i.e. “Take a Spin!” or “Back 2 Spaces”. If they “Take a Spin!” they must also follow the instruction of what the arrow lands on. 
Percy-Jackson-Olympians

A family that reads together, stays together! 

We had so much fun as a family playing our Percy Jackson & the Olympians board game.

More About the Series

Percy Jackson & the Olympians by Rick Riordan

Read the 5-book series that has been on the New York Times bestseller list for over 500 weeks!

Learn about Greek Mythology as the Percy Jackson series offers readers a fresh and exciting way to learn about the Olympians, the Titans, the Minotaur, and more while enjoying a fast-paced, highly entertaining adventure!

Percy-Jackson-Olympians